DIY: Rim's Wrap with Stickers

DIY: Rim's Wrap with Stickers

I love those rims like Volk Rays TE37 especially the Time Attack version. But ugh, the price is too high for me, around 20mil IDR. I almost buy their replicas, for not so expensive price about 3.6 - 3.8mil IDR. But hey! It will stretch my OEM tire which has max width 6.5 inch. The rims need 7 inch so my tires will be like donuts: thinner and pretty not save for a log ride, especially for touring. I don't have any budget to buy matching tires, so for now: bye bye TE37... sigh...

Now what? To have nice black rims I have another two options: paint them or wrap them with stickers. But for painting their original coating need to be removed! Oh no! they're slighty brand new rims! So, stickers! So here I have 5 rims shown like this:
 

My tools & materials, and the finished result. It's not my best wrap, but I manage to DIY better on the next rims. In fact, I wreck this version and re-wrap it again using my latest technique.


First, I must know how well the sticker will bend following the rim's curves. So I've learned enough by disposing one set of stickers for test trial. What I've learned is the sticker will be splitted if I force it to follow valley curve, even it preheated with hot gun. So I have to put more layers on those kind of areas. I also put another layer on narrow holes because the remaining 'flaps' won't cover the whole surfaces (right pic). Here we go:


After layering complete, I put a sheet sticker, large enough to cover the whole rim. Then I did the exact same things like the video in Youtube HERE, my initial inspiration. I think video speaks louder than words... Hehehe... Those guys are wrapping a descent rim so the sticker won't split much (but you'll see them plaster it here & there to wrap uncovered areas).


Toyota Prius Cabin Air Filter Replacement Guide

Toyota Prius Cabin Air Filter Replacement Guide

1 Open Lower Gloves Box


Toyota-Prius-Cabin-Air-Filter-Replacement-Guide-002 

2 Side Damper Arm


Toyota-Prius-Cabin-Air-Filter-Replacement-Guide-003 

3. Arm off mounting peg
Toyota-Prius-Cabin-Air-Filter-Replacement-Guide-005 
4. Push sides inward
Toyota-Prius-Cabin-Air-Filter-Replacement-Guide-006
5. Release side wall stops
Toyota-Prius-Cabin-Air-Filter-Replacement-Guide-007 
6. Swing filter cover open
Toyota-Prius-Cabin-Air-Filter-Replacement-Guide-011 
7. Slide out cabin filter
Toyota-Prius-Cabin-Air-Filter-Replacement-Guide-013

Toyota Prius Overhead Map Light Bulbs Replacement Guide

Toyota Prius Overhead Map Light Bulbs Replacement Guide

Toyota-Prius-Overhead-Map-Light-Bulbs-Replacement-Guide-002Toyota-Prius-Overhead-Map-Light-Bulbs-Replacement-Guide-003Toyota-Prius-Overhead-Map-Light-Bulbs-Replacement-Guide-004Toyota-Prius-Overhead-Map-Light-Bulbs-Replacement-Guide-005Toyota-Prius-Overhead-Map-Light-Bulbs-Replacement-Guide-007Toyota-Prius-Overhead-Map-Light-Bulbs-Replacement-Guide-009 

Insert the blade of the small flathead screwdriver in between the overhead console and the translucent plastic map light lens cover. To protect the plastic surfaces, you can place a thin cloth over the blade of the screwdriver.

Gently pry out the lens cover and set it aside in a safe place. You may have to pry with the screwdriver at several locations around the lens cover. Only minimal force should be needed to pop out the lens cover.

Grasp the old map light bulb with your thumb and forefinger before pulling it straight out of the socket.
Push a new # 168 light bulb straight into the map light bulb socket.

How to Replace the 12v Auxiliary Battery 2004-2009 Toyota Prius

How to Replace the 12v Auxiliary Battery 2004-2009 Toyota Prius

If you haven't already, check the health of your 12v battery. As I said there, unless your car doesn't start at all it's tough to know if you need a new 12v battery in a Prius. After testing my 12v battery and finding it to be weak I decided to replace it because I don't want to be stranded somewhere. Yes, it can be jump started but I've done that before with other cars and would rather preemptively replace this. And just to be clear, this is the small battery in the Prius, NOT the traction battery used to power the electric motor!
Tools Needed:
  • Socket set w/10mm & 14mm deep sockets
  • Socket extension
  • 10mm box wrench
  • Thin flat screwdriver
  • Torque wrench (in-lbs)
  • Torque wrench (ft-lbs)
Parts/Supplies Needed:
  • Optima Yellow Top DS46B24R 12v battery (direct fit). I'd recommend either ElearnAid (see notes below) or Amazon.
  • Jumper cables w/spare 12v battery or portable jump starter or AC to DC 12v power adapter with cables to connect
  • Tape, rag or baggie to cover disconnected negative cable

Preface: If you read some of the reviews on Amazon you'll see that the stock battery isn't great. With a high performance direct fit Optima Yellow Top available I cannot see buying the OEM battery. If you follow this guide you'll probably even save some $$$ and have a better battery. Plan on ~1 hour or less for the job. If you're doing this as a planned replacement you will want a backup 12v source hooked up so you don't lose settings and have to initialize systems. If your battery is completely dead the repair manual indicates systems will need to be initialized (RM IN-34). I'm not including that procedure as this tutorial assumes preemptive replacement.
Normally I don't plug an individual website but am making an exception here. I know it sounds weird to buy an auto battery from a website titled ElearnAid.com but they've been selling Optima Yellow Tops for the Prius for years; I bought 2 of them from this company (current price, no discounts or anything for writing this). They have the old version too but why buy that when they have a direct fit now (link above). Not only did ElearnAid process & ship my order crazy fast they packaged the batteries with care and sent replacement instructions. Since they packaged this so well I had to take a few pics on the mind-numbing subject of packaging! Packaging 1 Packaging 2 gotta love that flat-rate box for a dense object like a battery.

1) Push on the area indicated by the blue arrow and remove the fuse box cover. 
2) Flip up the positive cover on the fuse block, circled in red is the 12v positive access location for jumping. Circled in white is the strut bolt which can be used for the negative ground point.

3) Hook up the aux 12v power source so you don't have to initialize systems and loose all your settings (major thanks to Hobbit for this tip!). Hook the jumper cables up in the order shown in the pic. I used the second Optima I bought since it was easy but if you have another car you could hook up to that battery (car off) as if you were going to jump the Prius. A portable jump starter would be even easier. You could even use an AC to DC adapter if you have the correct clips. When you've got the new battery swapped out remove the cables in reverse order: 4, 3, 2, 1.

4) Follow all steps except 3 & 5 to remove the rear covers

5) Optional step: Remove the two 12mm bolts circled in red on the floor and the one 10mm bolt circled in red on the top of the brake control power assy. Next push on the release tab on the connector circled in blue, disconnect the connector then remove the brake control power assy. Torque on all 3 bolts = 14 ft-lb (19Nm or 194 kg-cm). I removed this for easier access to the battery and to get better photos for this tutorial but the repair manual does not list this as a step; it can be done without removing this.

6) Use a 10mm box wrench to loosen the negative battery post bolt. Just loosen it and then wiggle the clamp off the battery post, circled in red. Once the negative lead is removed cover the metal in some way so that you don't accidentally short anything out. You can tape it up, wrap a rag over it a few times, whatever works for you. As you can see the bolt on the negative battery faces away from you so you can't get a socket in there. When putting this back on and tightening just make sure it doesn't wiggle on the post, don't over tighten. If you do actually torque the positive terminal you can use your box wrench on that to see how tight it is and try to match tightness on the negative bolt. .


7) Use a small flat screwdriver to remove the 3 claws and slide the positive cover off. If you start with the claw closest to you the others kind of wiggle off with a little help from your screwdriver

8) Use a small flat screwdriver to push down the tab on each connector circled in red and then disconnect them. You can now pull the entire wire harness out of the way of the black vent duct. 

9) Remove the two 10mm bolts and slide the vent duct out. Torque = 35 in-lb (4.0 Nm or 41 kg-cm). Note when reinstalling, I just tightened the silver bolt by hand as it goes into a plastic holder that could easily strip.


10) Use a 10mm socket to remove the 3 bolts circled in red, the bolt on the battery post just needs to be loosened. Now the clamp on the battery post will probably still be tight but at this point you need to wiggle the entire hold down clamp up and off. The black hold down clamp is attached to the positive clamp. Just don't pull on the fuse block. Now twist the battery vent hose and pull it out.
Torque on the battery clamp bolt = 53 in-lb (6.0 Nm or 61 kg-cm). Torque on the 2 hold down clamp bolts = 48 in-lb (5.4 Nm or 55 kg-cm). When reinstalling after you have the new battery situated and pushed all the way back, I did the hold down clamp bolt in the floor first, torqued it, then did the hold down clamp on the other side but didn't torque it all the way to spec as it was plenty tight. I just went by feel. Lastly, I torqued the positive clamp bolt to spec.


11) Remove the battery. It comes out following the left curve of the black battery bracket.

Differential Fluid Change

Differential Fluid Change

Following are some instructions and pic for anyone interested in what is involved in changing the rear "differential pump fluid” of an Element (or CR-V)

First things first…I’m not a mechanic…nor do I play one on TV. Be safe...wear safey googles, set the parking brake and use a wheel chock and sunblock and a condom. This info is free…and you get what you pay for so here we go…


You’ll only need a few basic tools:
1. A 3/8” drive ratchet handle for loosening and tightening the plugs.
2. Drain pan…. nothing fancy, just has to hold 1.1 quarts.
3. Pump or Funnel…you’ll need to get the new fluid into the diff.
4. You might want to put the vehicle up on ramps to make access easier and/or use some sort of pad to make sliding under the car easier.


You’ll need 1.1 quarts of Honda “Dual Pump Fluid…figure on about $7/quart. *Note-this has been replaced by "Dual Pump II," you shouldn't mix the two fluids, but version II can be used in older Es as version I is discontinued* Seem a lot like ATF to me…but diffs are expensive and I don’t wanna take any chances. You can look for an alternative product if you want, but it ain’t out there so just suck it up and give the $15 to yer local Honda stealership. You might wanna get replacement sealing washers while your there. I skipped ‘em ‘cause I’m such a rebel.

Lets get started….

This is what it looks like under yer E....looking forward:

This is the rear differential as viewed from just inside the left rear wheel:

Note the two plugs, upper and lower.


To loosen the plugs you’ll need a 3/8” drive ratchet handle or similar. The square hole in the plug is the same as the rachet handle so you won't even need a socket. If yer vehicle is older you might wanna hit the plugs w/ a bit of “penetrating lubricant” (I like CRC 3-36 or KROIL) a while before attempting to loosen them.

Loosen the fill plug first…the upper one. It does you no god to drain the fluid if you can’t refill it afterwards. Mine is only 3 years old but they "cracked" loose. Take yer time and be prepared to use some creative language if yer rachet handle is short.

Loosen and remove the lower (drain) plug. What happens next is no big surprise…red fluid drips out into a pan. If you’re using ramps you might wanna drive off the ramps so the vehicle is level for best drainage.


This is what the plugs look like once removed.....note the 3/8" square drive and (aluminum?)sealing washer:
(FWIW....I've heard these were 20mm....but I measured 'em at 19mm w/ a 1.25 pitch...very odd size)


Now that all the fluid is out you gotta put some back in…

Replace the lower plug. Clean it off and snug it down nice and tight. See yer service manual for proper torque specs. I used a “Farmer’s Torqure Wrench” set to “two grunts.” Remember what my Mom used to say…"tight is tight, too tight is broke." 

You can use some sorta pump (like the one I left at work) or a funnel and some hose to replace the fluid. I used a hose clamp to affix a piece of vinyl tube ( ½” ID x 5/8” OD) to a funnel and routed the hose around the rear wheel and across the axle to the diff.  


After pouring 1.1 quarts of fluid into the funnel (or pump), replace the fill plug and be certain it is tight. You can leave it loose (or not reinstall it at all ) like the typical Quickie-Lube place, but you’ll wanna make it snug if you care about yer Element at all. (35ft/lbs like the drain plug)

Wipe off, clean up….and go have fun.

for less than $20 (including funnel and hose) you just saved yerself a whole bunch ‘o trouble. This is easier than an oil change and only needs to be done every 30,000 miles or so. Yes, yer manual says different... but diffs are expensive and a little preventive maintenance goes a long way.

Good luck, have fun....try not to poke yer eye out.

Auto Trans Fluid & Filter Replacement DIY instructions

Auto Trans Fluid & Filter Replacement DIY instructions

This first section answers some FAQs and gives some background to the fluid and replacement procedures, the second covers tools and materials, the third & fourth involves the trans fluid, and the fifth filter replacement.

General Info & Details:

how do I check the fluid level?
Check the level with the fluid hot. Not just "drive around the block warm," you want to drive at least 5-10miles/15 minutes or so. The vehicle should be parked in a level spot. With the motor still running, slowly run the gear selector up and down thru all the gear positions. Return it it park and shut the motor off. Pull the dipstick immediatly, wipe it off and reinsert it. Pull it out and look at the level. It should be near the top of the range. Check the fluid for "condition" also....you want it to be a nice bright red color and not smell burnt. When reinstalling the dipstick be sure to position the handle facing towards the breather pipe next to the dipstick hole.

when should the fluid be changed? According to my owners manual, every 120k miles or so. I think it may have been reduced to 90k on some newer model. It is rather vague about changing it based on “condition.” Either way, this is not often enough IMHO. I suggest every 60k, or even sooner if you tow often or the vehicle gets used hard. I’ve been doing mine about every 20k miles since it reached 30k.

If your fluid looks dirty, isn’t a nice red/dark red color, or smells burnt, it needs to be changed.

When the fluid is drained, about 60% of it stays in the trans/torque converter. More frequent changes ensure there is plenty of good fluid in your transmission.

what about “flushing” the transmission? Be careful, the term often means that a “power flush” is performed and may include chemicals not normally found in Honda trans fluid. Honda says do not do this. I agree, and so do many others.
If by “flushing” you/they mean draining the fluid, refilling, operating the car a bit, and then repeating the drain & fill process several times, then it is a perfectly acceptable way of replacing the fluid.

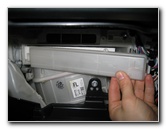
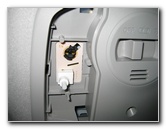
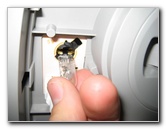
where is the filter? The dealer says it doesn’t have one? It has an inline filter located low and just in front of the radiator. Honda says replacement is only necessary if the transmission is rebuilt or replaced. I like to replace it every other fluid change, but I’m sure every 60k miles is plenty.

what kind of fluid do I need? Can I use synthetic? Honda recommends replacement with Honda ATF-Z1 only. I personally don’t recommend anything else, but some claim good results (or bad results!) with aftermarket fluids. Use the search feature and your best judgments and please don’t clog this DIY thread up with fluid, Amsoil, etc discussion.

The official Honda specified fluid capacities are:
4wd - 3.3 quarts at change, and holds 7.6qt overall
2wd - 3.4qt at change, and holds 7.2qt overall

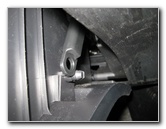
what about drain plug torque specifications? The drain plug is M18x1.5 pitch and should be torqued to 36lb-ft (49N-m). It uses a special crush washer.

I overheated the trans and now the fluid smells bad, what should I do? Change it. Do a full “flush,” drain & fill and repeat 3 times. It may save it, or at least prolong replacement.

What about a transmission cooler? The Element has one built into the radiator. It should be flushed (or replaced) whenever the trans is replaced or rebuilt to avoid contaminating the new trans. An auxilary tran cooler is a good idea for anyone that does serious towing. Do a search and/or check the towing section of the EOC for more information. Most install "inline," much like the filter.

How to Replacing the drive belt Honda Element

How to Replacing the drive belt Honda Element

The procedure is fairly straight forward:

Need:

• Replacement belt P/N 38920-PZD-A01
• Serpentine Belt Removal Tool (with adjustable offset) and 14mm 6 sided socket
• 10 mm open end wrench

1. Turn front wheels hard right (or remove RF wheel) and remove the plastic access panel to exposed the main crank pulley
2. Using a 10mm wrench loosen (but don’t completely remove) the bolt holding the power steering line clamp on the fender wall. Moving the clamp and steel tubing around later on will help with a tight clearance when attaching the tensioner tool to the pulley bolt.
3. Assemble the tensioner tool with an angle (using the extension) and shallow (again, for clearance issues) 14mm six sided socket – see picture below

Honda Element Door panel and lock removal DIY

Honda Element Door panel and lock removal DIY

This is done on my '05 with power windows and locks. I'm pretty sure they're all set up this way but the SC might be different.


Remove the 2 screw covers and the speaker grille.


Remove the 6 phillips screws. One under the armrest, two on the door handle and three on the speaker.


Push forward on the door handle to release, disconnect the door handle linkage and the power connector. Yes I'm wearing gloves... it's freaking cold today. You see how much I go through for you guys.


Remove the two trim pieces (top front and rear). The front one is removed by pulling at the top and lifting off.

The rear one is, sometimes, not so easy. It is supposed to be pried off from the bottom corner but it uses a metal snap-in that can be pretty tight. Once that clip is loose it lifts off to the front.


Removing the "nose" or front bumper cover Honda Element

Removing the "nose" or front bumper cover Honda Element

Removing the nose (front bumper/grill/etc) of an Element is fairly straightforward and simple. Follow the "official" instructions for fog light installation as provided by Honda (thanks H & A) or just figure it out as you go along.

It has been mentioned and discussed for a long time here on the EOC, but I figured ithe "project" needed its own thread.
Here are some pics and info to help guide you.

There are several pins or clips that hold the nose along the top by the radiator.

As mentioned in another thread, a paint can tool works great for this.


Leave two in place to hold the nose while you remove the rest of the fasteners.


The two "tricky" spots are mid way along the fender. Remove the screw (8mm hex tool) and then pull out on the fender a bit to slip the nose tab off the post.


Then there are four screws along the bottom (two on each side) and some more clips along the middle. The clips remove just like the top ones, the screws take a 10mm socket or wrench.


After all the clips and screws are removed simply slip the entire nose off. It takes a bit of wiggling, especially around the headlight and fender area.

Be sure to put it down on a blanket or something to prevent it from being scratched.