Car ECU Reseting


English: An electronic control unit (ECU) from...
English: An electronic control unit (ECU) from a 1990 Geo Storm GSi. (Photo credit: Wikipedia)
The ECU of your car is like its brain. For your car to deliver it's best performance you have got to stay it during a work condition the least bit times.

The following is how to reset your ECU, which all Honda technicians do prior to returning your car from the shop:

step 1: Ensure the car is at opperating tempreature (i.e., take it for a drive or let it idle for a 15 mintues).

step 2: Take the fuse for the ecu out -- on my s2000 its labeled "Backup" but do research on yours because it could be different -- wait 15 minutes.

step 3: Put the fuse back in.

step 4: turn the car on. DO NOT TOUCH ANYTHING. GIVE IT NO GAS. let the car idle for roughly 15 minutes, or until the car is idling smooth at lower rpm's.

step 5: Turn the ignition off. ONCE AGAIN, DO NOT TOUCH ANYTHING OTHER THAN THE KEY. Immediately turn the ignition back on after you have gone to full off. this will store the new settings your ecu has made.

These steps will properly reset your ecu. After they are accomplished go do whatever, the new settings have been stored.


Cleaning Throttle Body


Throttle body
Cleaning the throttle body on a fuel injected engine is one of the most effective ways of restoring idle quality, performance and fuel efficiency

Park your vehicle outside in a well-lighted, level area. Because the throttle-body cleaners are volatile, we do not recommend doing this job indoors.

Locate the throttle body under the hood in the engine compartment. Here are some hints on what to look for:
  • The throttle body is located between the air cleaner and the intake manifold of the engine.
  • Most throttle bodies are made of aluminum.
  • The throttle body is connected to the gas pedal of your vehicle with a linkage or flexible cable, which moves the throttle shaft when the gas pedal is depressed. (If you're having difficulty locating the throttle body, ask a helper to press the accelerator - with the engine off - so you can see the movement of the throttle shaft.)
Once you have located your vehicle's throttle body, look at how it is attached to the air-intake tubes. Sometimes throttle bodies are attached with special fasteners called Torx-head screws. If so, you will need Torx bits or Torx screwdrivers to remove these fasteners. More commonly, a flat-blade or Phillips-head screwdriver should do the trick.

There may be one or more electrical wires that connect to the throttle body. Do not disturb these; for purposes of this project, you should not need to disconnect any of these terminals.

While we always recommend that you follow all appropriate safety precautions for these DIY projects, this is even more important for this project. Do not smoke when you are working on your vehicle, wear all recommended skin and eye protection and generally be aware that you are dealing with a flammable spray cleaner.

How to stop Radiator Leak

engine coolant radiatorLocate the leak. Sometimes, you can see steam coming up from the radiator, indicating a pinhole or ruptured seam. Otherwise, wash down the radiator and the hoses with water and start the engine again; as it runs, watch for the leak.


Let the engine cool off. Once you've found the leak, wait a few minutes to take off the radiator cap; otherwise, you could be scalded by hot water or steam.

Plug the leak. Keep in mind that these are temporary fixes and are not meant to be substitutes for a permanent fix - they're meant only to get you to a repair shop. You have a few options; use what you have on hand or can attain most easily:
  • Use cold weld epoxy. This is the safest and most reliable option, but it might be hard to find if you suddenly break down. To do this, make sure you have water on-hand before you drain the radiator. After it's dry, apply the cold weld epoxy over the leak. This method will require waiting about two hours for the epoxy to dry.
  • Use an egg. One or two eggs will temporarily stop the leak by cooking in the hot water of the radiator. The pressure of the radiator will force it into the leak (if the leak is in the radiator itself and not one of the hoses).
  • Use black pepper. Pour a spice-rack-sized container of pepper into the radiator. It will flow to the split or pinhole and will harden like a rock and plug the hole. If you don't have pepper, paprika, cornmeal and mustard powder are acceptable alternatives.
  • Purchase a commercial leak repair product. These are widely available in most automotive parts and supply stores. Use these as a last resort; it should be noted that adding any of these types of products to the cooling system of your car can obstruct the flow of water through the radiator, and potentially damage other parts of your car such as plugging the heater core.
  • Weld the leak. If you have the expertise and the equipment, you can try to remove the radiator from the car and weld the leak yourself.
  • Use duct tape. If the leak is in only on one of the hoses, you can wrap duct tape around it for a temporary fix until you can purchase and install a replacement hose.
Build a vacuum. Remember to install the radiator cap so pressure will build and force the epoxy, pepper or egg into the leak.

Get to a repair shop. A leaky radiator will require a more permanent fix than those listed above. Any additives may be flushed out by high pressure later when a permanent professional repair is made.


Tips to choose Right Windshield wipers

English: Windshield wiper assembly removed fro...It's best to err on the side of caution when setting your intermittent wiper speed. Too many people try to go for the minimum frequency of passes, but this practice can lead to poor visibility if the rain becomes heavier.

Get in the habit of cleaning your windshield every time you fill the gas tank. Too much debris and dried residue can greatly impair the amount of contact your windshield wipers have with the glass.

Lift your wiper blades off the windshield when the car is at rest during the winter months. This is the best way to prevent them from freezing to the glass and creating an unexpected hazard when you try to operate them in the cold.

Never drive if one of your blades is broken or missing. No matter how experienced you are, it is simply unsafe to operate a vehicle if you can only see out of half the windshield.


Instruction to choose


1 Turn on your existing wiper blades and test their operation using a hose or misting device. If the blades are shuddering, squeaking, streaking or failing altogether, it's important to figure out why.

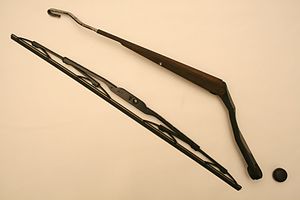
2 Examine the blades to diagnose the problem. Cracked and warped rubber are the two most common culprits, but you may also see a bent frame or a split in the rubber.

3 Remove the worn-out blade and take it to the auto shop, so that you can choose the right one.

4 Browse the selection at a local auto shop. These days, windshield wipers come in a variety of rubber composites and sheaths, including some specifically designed with weather shielding for winter months or air foils to "cling to the glass" at high speeds.

5 Make your purchase based on the problem that sent your last blades out of commission. If the rubber has grown rigid and cracked, for instance, you want to get a UV-resistant product that won't dry out and lose its elasticity in hot weather.

6 Test the blades at high speed if you can. Many auto shops now allow for test drives, because they are catering to informed buyers who want to make smart choices.

7 Replace your wipers after a year to ensure maximum reliability.


Repair power steering leak

DIY power steering leak step

First Park your car in a safe place and open the hood.

Second Find the power steering system on your vehicle by following the part of the steering column assembly that goes through the firewall (the engine compartment wall on the windshield side of your car). Follow the components connected to the steering column all the way to the wheel assemblies and hoses connected to the power steering pump and reservoir.

Third Clean wet and dirty components around the steering system, using shop rags if the leak source is not readily apparent.

Fourth Start the engine, and rotate the steering wheel all the way from left to right several times to increase system pressure.

Fifth Turn off the engine and inspect the system from the engine compartment, using a flashlight if necessary. In some cases, you might have to wait a day or two for the leak to reveal itself.

Sixth Look for possible cracks around the power steering pump. If you find fluid around the pump case, the case is damaged and should be replaced. Some pumps are equipped with internal seals that may be replaced when necessary. Also, look around the reservoir and make sure it is in good condition; a cracked reservoir needs to be replaced as well.

Seventh Make sure the fittings around the hoses are tight. Tighten clamps using a Phillips screwdriver or ratchet and socket, depending on the type of fitting or clamp used in your system.

Eight Check along the hoses for cuts. If possible, run your fingers along the length of the hose to find hidden wet spots. A hose leaking somewhere along the middle will have to be replaced. If the cut is close to the end of the hose, you might be able to cut off the damaged part and reconnect the hose to the component.

Nine Check metal lines connecting the steering-gear assembly to other components. A ruptured metal line needs to be replaced

Ten Inspect the rubber boots between the ends of the steering-gear assembly and the arms linking the assembly to the wheels. If fluid is leaking at either end, seals at the ends of the steering-gear assembly will need to be replaced.

Eleven Raise the front end of the vehicle with a floor jack and support it on jack stands. Inspect the steering-gear assembly closely.

Repair IACV ( Idle Air Control Valve )

1) Now you got to locate where the IACV is, pop your hood and it’s located directly behind the intake manifold. It’s actually connected to it. Remove your intake and strut tower bar.

2) Place a couple of rags underneath to catch the coolant spill. Loosen the two hoses running to the IACV with your pliers by squeezing the two clips and moving them away from the end.DO NOT cut the hoses as they are the exact length and you will have to buy new ones if you do.

3) After doing that remove the harness connected to the IACV on the driver side

4) Then to finally remove it from the intake manifold, remove the two 12mm bolts

5) Take your brake cleaner or simple green and start to clean up the inside of the IACV by spray inside the two holes. Continue to do this until no more dirty fluid comes out. Should take anywhere from 5 minutes to 15 minutes. This depending on how old and dirty your IACV is.

6) Once you’re done cleaning out the IACV let it air dry. I let it air out for 20 minutes while I did other maintenance on the car.

Reasons why you should take it apart and clean it:
-High idle after your car warms up
-Lumpy idle
-Roaming idle
-Hunting idle
-Fluctuating idle

Tools Needed:
Ratchet
12mm Socket
Pliers
Brake Cleaner or Simple Green
Paper Towels
A cooled down engine for at least 2 hours

Cleaning Idle Air Control Valve ( IACV )

Throttle body showing "wide open throttle...Throttle body showing "wide open throttle" sensor on the right (Photo credit: Wikipedia)
Do it Yourself for Cleaning IACV

First locate your IACV it looks like this and on D series engines its mounted on the rear of the intake manifold near the throttle body, and on F series engines its mounuted towards the front of the car on the intake manifold near the throttle body

Second remove it, all you need to do is take the 2, 12mm bolts out, disconnect the electrical connection, and your heater lines that run to it. (note put a rag on the heater lines so it doesnt spill everywhere)

Third take some brake cleaner or carb cleaner and spray out the screen, which as you can see is very clogged on my 180K+ D15b8.

Fourth Let it dry, then reconnect your electrical connection, your heater lines, and your bolts and BAM your done.